Showing posts with label ♥ Cakes. Show all posts

Saturday, 25 May 2013

黑糖寒天瑞士卷

通常在市面上看到的
都是以红豆,水果或是薯类作为瑞士卷的内馅
从来没有想过,瑞试卷里可以有布丁,寒天冻/燕菜条
感觉上蛮不错
于是就试试,看是怎样的组合

参考了Carol老师的食谱
就开始了我生平第三个瑞士卷

第一次做的瑞试卷,不是很完美
由于家里没有合适的烤盘
结果蛋糕体太薄了,而且外观上也不是很好
于是就花了几十块买了两个12" x 12" x 1" 的烤盘
迫不及待想试试看新买的玩具
嘻嘻~~

驾了两个小时的车程,千里迢迢回到金宝
没休息就开始做瑞士卷了
一个是绿茶红豆口味,另一个就是今天的主角
黑糖寒天冻瑞士卷 ^.^

随便乱画的,送进烤箱前还不错看的
可是 ... ... ... ... ... ...

从烤箱拿出来后 ... ...
呜呜呜~~
好丑哦~~伤心
什么图案都没了
='(


绿茶红豆瑞士卷~
太多鲜奶油了~>,<

整体来说,黑糖口味的,对我而言有点甜
下次要减少糖的成分比较好


黑糖寒天冻
材料:
黑糖 120g
水 400cc
寒天粉 5g (我用燕菜粉代替)

普通的燕菜做法。

黑糖蛋糕体
材料:
A. 蛋黄 5个
黑糖 50g
植物油 50g
冷开水 60g
低筋面粉 100g

B. 蛋白 5个
柠檬汁 1茶匙
细砂糖 50g

做法:
1. 冷开水加黑糖煮溶,待冷却备用。
2. 将蛋黄打散至淡黄色后加植物油搅拌均匀。面粉和黑糖水分2次加入蛋黄糊立搅至没颗粒。

3. 蛋白打至发泡,加入柠檬汁和砂糖(分次加入)打至硬性发泡。
4. 舀1/3蛋白进蛋黄糊里,用切割的方法搅匀。把搅匀的蛋黄糊倒入剩下的蛋白里,用同样的方法搅匀。

5. 将搅拌好的面糊倒入铺好烤纸的烤盘上,用170度烤13-15分钟。
6. 将烤好的蛋糕放冷后,在要卷上的那一面花上几刀,涂上一层鲜奶油再放上黑糖冻条和少许鲜奶油,卷起。


7. 把卷好的瑞士卷放进冰箱里冷藏,待定型后再切片。


*个人觉得12" x 12" x 1" 的烤盘用5粒蛋太厚了,如果4粒应该会比较好。

Wednesday, 17 April 2013

异地情怀,法式经典甜品~舒芙蕾 Souffle

舒芙蕾又称之为蛋奶酥,源自于法国
而法文Souffle意思是‘吹气’
舒芙蕾的质地松松泡泡,吃起来像云朵般软软绵绵的
然而,这梦幻般的甜点,却要趁热吃
因为,一旦离开了烤箱,就会在短短的一分钟内迅速的扁塌
可以说是一种稍纵即逝的梦幻甜点

舒芙蕾大约在中世纪时代就产生了
是当时富裕人家的餐后甜品
由于当时的法国人一餐往往要花上三至四个小时品尝将近20道佳肴
吃到最后,都吃不下了
所以,当时的厨师想出了这种
过度膨胀,吃了也没什么感觉的甜点

舒芙蕾大部分的组织都是空气
将打发的蛋白和牛奶等混合成的奶黄酱
烤制而成的
由于蛋白里含有大量的空气
一受热便会向上膨胀,高高地耸立在烤杯之上
十分壮观

资料来源 爱在厨房

材料:
A:牛油 适量
砂糖 适量

B:牛油 30g
牛奶 100g
玉米淀粉 15g
砂糖 5g
蛋黄 2个
香草精 1小勺

C:蛋白 2个
砂糖 30g

做法:
1. 将牛油均匀地涂在烤杯上,然后撒上一层砂糖备用。
2. 牛油,牛奶和砂糖加热至牛油融化,倒进玉米淀粉煮至浓稠,离火放凉。
3. 牛奶混合物放凉后,加入蛋黄和香草精搅拌均匀。
4. 蛋白加砂糖打至湿性发泡,尖端呈弯钩状即可。将打发的蛋白和奶黄酱混合均匀,倒入撒了砂糖的烤杯上,送入烤箱烤20-30分钟,180度。

附上几张照片~

胀的好高哦...开心~

没拍几张,就开始塌陷了~

没一会儿就吃光光了~^.^

Tuesday, 19 March 2013

Second Birthday Cake - Choco Velvet Cake


Red Velvet Cake, was so famous in Western Country
Many of them, I mean bakers love to bake this lovely cake!
And I was fall in love with Red Velvet Cake with my first try at Dreamz Bakery
The sourness make you feel like have 2nd...3rd...4th...5th  and more bite on the cake
You definitely will say "May I have one more piece" 
Lolz

Actually, the charming colour of Red Velvet Cake is comes from a plant,
which called Beets
Beets or beetroots is belong to the Chenopodiaceous family.
There are several benefits of beets such as:
1. Good for heart
2. Avoids birth defects
3. Prevent certain cancers
4. Good for liver
5. Prevent respiratory problems
6. Boosts energy
7. Prevent cataract
8. Capillary fragility
9. Mascular degeneration
10. Stroke

Beets juice helps in the production of human sex hormones. In ancient times, beets was used to cure fever and constipation. In the Middle Ages, beets was also used as a remedy for digestive disorders. Besides that, beets leaves are also good for curing wounds.

However, beets contain oxalates which also called organic acids. If one is have too much of beets, it can cause body fluid to crytallize. So people with kidney or gallbladder problems should avoid beets.

*Information retrieved from Organic Facts*


Ok, since it is my Grandpa's birthday
So I decided to make a birthday cake instead of buying from bakery shop
So, switch on Ipad, gear up and google search for the recipe
found a lot of Red Velvet Cake recipes
most of it using artificial colouring to make it red in colour
but I personally think that
Although the RED colour is very attractive and beautiful
but for the sake of our health
and it is so difficult to get beets in Kampar market
It is better not to put any artificial colouring
Especially it is bake for my grandpa
So just make it as Choco Velvet Cake with Cream Cheese Frosting

My Masterpiece - Not as decorative as Bakery Shop
But still consider good right?


Sorry that couldn't take the picture of the process due to I am rushing to finish it at the evening on that day
So...
Only have this few


The recipe was retrieved from Martha Stewart 
and the Cream Cheese Frosting was retrieved from Pinch My Salt

Please refer to the links above for ingredients and methods
Note: 
(1) The cake body from Martha Stewart is too sweet, so I reduce the amount of sugar to 1 cup, but it is still sweet. Maybe you could reduce more since the ingredients of frosting are mostly sugar.
(2) Personally added about 10 teaspoon of lemon juice into the Cream Cheese Frosting.
It was a bit too liquid, have to modify a little bit next time. First time was the experiment.

By the way, according to my colleague,
she claimed that Red velvet Cake from The Bee & Ben's Cafe is used beets!
Should pay a visit next time!
xoxo

Wednesday, 5 December 2012

Walnut Butter Pound Cake & Royal Icing Butter Cookies

Yeah~~ Finally made this cute cookies today...
I think I should concentrate on my revision start from ... ... Tomorrow? 
Lolz~
Still have about 2 more weeks for me to do revision on this repeating subject
May god bless us, ALL of us can graduate on time, no more extend

Okla~~I promise, today should be last day for me to bake anything
until I finish final exam
XD
Since now is holiday for my little sister
So I asked her to help instead of playing computer all the day
So, this is what she did~


Before I get started with the little cute cookies
I've baked a Walnut Butter Pound Cake
as a tea-snack for family
Recipe retrieved from Carol 自在生活
but I modify it a bit
(Sorry~~is a bit burn~~)

Walnut Butter Pound Cake
Ingredients A:
Flour 100g
Butter 100g
Sugar 20g
Egg Yolk 2

Ingredients B:
Egg White 2
Sugar 40g

Ingredients C:
Walnut for garnish

Directions:
1. Put butter in room temperature to soften. Beat it with hand whisker for one minute, gradually add in sugar and whisk again, until light and fluffy.
2. Slowly add in egg yolk into butter batter and whisk well.
3. Add flour into yolk batter and stir it with spatula.
4. Use electronic mixer to beat egg whites, meanwhile, add in sugar gradually until firm.
5. Add 1/3 egg white into yolk batter, use cut and fold to mix well. Pour the mixed batter into the leftover egg white. Once again, cut and fold to mix it well.
6. Pour the mix batter into the mould, garnish with walnuts. Send into oven, 170 degree celcius for 50 minutes.


Yeah~~ It is Royal Icing's Turn! 
So, let's share you the recipe for this little cute cookies~
By the way, the recipe retrieved from 小本厨房 

Ingredients A:
Butter 60g
Sugar 40g
Egg 30g
Vanilla Essence 1/4 teaspoon
Salt 1/4 teaspoon
Flour 150g

Ingredients B:
Icing Sugar 180g
Egg White 30g
Lemon Juice 1/2 teaspoon
Vanilla Essence 1/4 teaspoon
Food colouring

Directions A:
1. Put the butter in room temperature to soften it. Beat it with electronic mixer, add in sugar gradually, until light and fluffy.
2. Slowly add in egg yolk, vanilla essence and salt, beat well.
3. Add in flour and knead it with hand.
4. Roll the dough for about 0.5mm, cut it with any favourite cookies cutter. Place the cut dough on pan and poke some holes with toothpick, then send into oven for 20-25 minutes, 160 degree celcius. 
5. Let the cookies cool and decorate with royal icing.

Directions B:
1. Sift icing sugar into a bowl, add in egg white and stir well. Add in lemon juice and vanilla essence. Stir well.
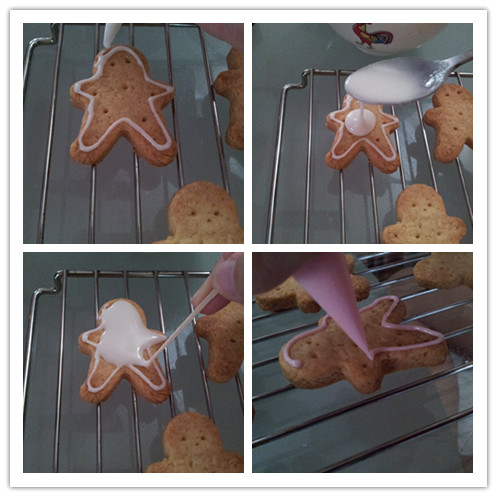
2. Divide the royal icing into three bowls (I use 3 colours). Each colour scope about 1 or 2 spoons into three piping bag, to draw outline.
Thicker one as picture 7 shown.
Thinner texture as picture 6 shown.
3. Leftover royal icing add little water to make it thinner. Put aside.
4. Place the cooled cookies on rack and decorate.

Hmmm...today is the first time I make Royal Icing Butter Cookies
The shape, the decorations not really nice
But, nevermind, practices make perfect!

So, here is what I made~~


Friday, 23 November 2012

Caramel Pudding Chiffon Cake with Instruction

You know what, after I posted the post about the perfect combination - Caramel Pudding Chiffon Cake yesterday
Then I baked it today right after my last presentation of this semester
So, I'm trying to capture some of the steps of when making this cake

Recipe:
Caramel Layer~
60g Sugar
28g Hot Water

Pudding Layer~
50g Egg Yolk
120g Whole Egg (About 3 eggs)
240g Milk
31g Sugar
1/4 tsp Vanilla Essence

Chiffon Cake Layer~~
A. 50g Oil, 42g Flour, 40g Egg Yolk, 50g Milk
B. 103g Egg White, 27g Sugar

Instructions:
Caramel Layer

1. Melt the sugar until golden brown color, then pour the hot water into it and stir well.
*caution: be careful of the water vapor when pouring the water into it
2. Pour the caramel sauce on the mould and set aside.

Pudding Layer~~
1. Melt the sugar by heating the milk. Remove from stove when the sugar has melted.
2. Let the mixture cool down and pour the egg into milk mixture and stir well.
3. Sift to mixture of milk and egg, and add few drops of vanilla essence, put aside.

Chiffon Layer~~
1. Pre-heat oven, 155 to 160 degree celsius. Mix all the ingredients A and set aside.
2. Use an electronic mixer to beat the egg whites as the picture shown.
3. Gradually add in sugar when the egg whites in the form like picture (4).
4. Beat the egg white firm as picture (7).
5. Pour 1/3 of the egg whites mix with the egg yolk batter.
6. Pour the mixed batter into the remaining egg whites. Use cut and fold to mix it well.
7. Pour the pudding mixture on the top of caramel sauce. After that, follow by the chiffon cake batter on the pudding layer.
8. Put the mould that with all the batter on the other bigger mould and pour hot water into the bigger mould. Send it into oven, 155 to 160 degree Celsius for 40-45 minutes.

It can be serve when it is entirely cold. It will taste better after store in refrigerator for one night.
p/s: Separate the caramel syrup in a individual bowl to avoid the cake body too wet, if you couldn't finish it in a while.


Without Caramel syrup on top~~

Lolz~looked tempting right?!
(づ。◕‿‿◕。)づ

Thursday, 22 November 2012

Perfect Combination - Caramel Pudding Chiffon Cake

Sometimes, I'm just too free or bored
So, will just scroll up and down with my mouse
to see the Facebook updates, pictures of friends or the activities in groups
Hmmmm...The group that I view frequently is Baking Wonderland
to find out some tasty recipes that shared by the members

Somehow, I found a recipe which I feel that is unique
and it will be a perfect combination
Caramel Pudding Chiffon Cake
The name sounds tempting right?
 Sweet and bitter of caramel + Smooth and milky taste of pudding + Light and fluffy chiffon cake body
Oh my goodness!!
How do you think about it?
(─‿‿─)


However, the first Caramel Pudding Chiffon that I made, FAILED!
The cake body and pudding is fine, but my caramel sauce ... ... ...
(◜௰◝)

So I baked the cake without the caramel
The result of the cake overall is fine
But you will think that the pudding is very dry
Not smooth without the caramel!

Few days later, I tried again
Eventually, it was a SUCCESS!!
I'm so happy~~XD
With caramel sauce, the whole cake is extremely soft
When you shake the plate, the cake will dance~
"doink doink"~~
(づ。◕‿‿◕。)づ

You could see the difference between this picture and first picture above
On the other day, I continuous baked FOUR Caramel Pudding Chiffon Cake in ONE day!
One for My Dear, My sis which is in PJ, and also the workers of my dad
and last one, of course for myself and family 
I'm just in love with this!
Moreover, this cake won't be too sweet~


Recipe:
Caramel Layer:
60g Sugar
28g Water

Pudding Layer:
50g Egg Yolk
120g Egg White (About 3 eggs)
240g Milk
31g Sugar
1/4 tsp Vanilla Essence

Chiffon Cake Layer:
A. 50g Oil, 42g Flour, 40g Egg Yolk, 50g Milk
B. 103g Egg White, 27g Sugar

For the instruction, please visit 兔纸的藏包洞 ... ^.^