Saturday 8 December 2012

抹茶?绿茶?

我一直以为绿茶粉 = 抹茶
事实上,它们的差别很大

曾经和朋友到奶茶店买饮料时
还誓信坦坦地说,“抹茶明明就是绿茶!”
糗大了~
那现在就告诉大家抹茶与绿茶的分别吧~

抹茶,不管是栽培采摘到制作都非常地讲究。茶园必须特别注意管理,每年仅利用春茶制作,5月中旬采摘前20天,就要栽树上面搭棚遮荫,所采茶菁用蒸菁风冷干燥,做成原叶[碾茶],在精制拔茎,分级制成所谓[薄叶],薄叶再以石磨用每分钟60转的速度,在摄氏19度的恒温中,缓缓磨出翠绿色的粉末,这些粉末就是抹茶。而且,每一石臼一天最多磨出一公斤抹茶而已。抹茶是超细微的粉状物,可悬浮在热水中,不沉淀,因此可供抹茶到以茶筅点茶,呈现鲜绿的茶汤,久置亦无沉淀现象。


绿茶粉,亦称之为粉茶,是利用粉碎机将传统茶叶研磨成粉末,其平均粒径最细只达50-40微米,是抹茶平均粒径的13-16倍大。台湾改场亦已利用国产研磨机具,开发利用旋风分离研磨技术制造粉末,其粒度大小约80目-200目。粉茶无法悬浮在热水,久置即产生沉淀。此沉淀为抹茶与粉茶最大差异处。


除此以外,抹茶是春茶经过覆盖蒸青的过程在辗磨成粉,一般的绿茶粉是经过炒青而非蒸青的过程。

资料来源 日藤国际

Friday 7 December 2012

Trial Version of Green Tea Hokkaido Cupcakes

Well, although I promised not to bake anything until I've finish my final exam
But ... ... ... I really don't have the mood for study yet
So ... ...
Ok, today I tried something new
which is Green Tea Hokkaido Cupcakes~
Sounds nice right?
However, the green tea powder I bought not really good
Don't have the fragrance
Maybe next time should increase the amount of green tea
Perhaps, the flavour will be stronger

I use the original Hokkaido Cupcakes recipe, just add in 2 teaspoons of green tea powder into the chiffon cake and custard cream

Chiffon Cake's instruction:


Custard cream instructions:

Put the ready custard cream into refrigerator for at least one hour
then can piping into the cupcakes


贫民的点心 - 麻芝 Muachi

麻芝,再贫民不过的一个小点心
软Q的口感,配上花生粉的脆,还有幼糖的甜
用最简单的食材,往往却深受大众的喜爱
可是,价钱却不平民化
一个小的宝丽龙盒,装还不到 1/5 却卖RM3.00
想到,钱包就痛
RM3.00 不如自己做一大盘
可以吃到呕耶
哈哈~~

材料:
糯米粉 250g
斑斓汁 300g
糖粉 1teaspoon
油 4tablespoon
花生粉 适量
幼糖 适量
(我都只用了以上食谱的3/5而已)

做法:
1:将所有材料,花生粉以及幼糖除外,搅拌均匀。蒸15-20分钟。
2:用汤匙舀起适当的大小,沾上花生糖粉即可。


Wednesday 5 December 2012

梦想

我相信每个人都有梦想
小的时候都会想
长大了,我要当医生,护士,警察,还是老师等等的
而我当然也不列外

曾经,想过要当一名厨师。可是,小时候觉得厨师并没有警察,医生,还是护士来的高尚。每天只能在厨房对这锅锅铲铲的,弄到满身油烟,都不能打扮美美的~所以就放弃了。还曾一度想去报读Culinary Art,后来也打消了念头。

曾经,想过要当一名白衣天使。想到落后的国家给予帮助,就像“天涯侠医”的医生和护士一样。但我也忘了基于什么理由,打消了我想当护士的念头。

曾经,想过当一名出色的PR。举办大大小小的活动。但现在,我也开始转变了我的念头。要当一名搞活动的PR很累,应该没什么自己的时间。
渐渐地迷失了自己

虽然,我对我的事业很迷惘
但,有一样是我从小都喜欢做的事情
那就是,我非常喜欢在家做一些蛋糕饼干
然后和朋友分享
看到他们好吃的样子
就觉得很满足,很开心
不好吃,都会想知道那里不好
那么就可以改进一下

所以,从小就梦想着要做的,还在我脑海里的就是
我要当老板
要经营一间,浪漫舒服,有主题的
让人流连忘返的咖啡店
有空的时候,在自己的店里烤一些小蛋糕小饼干
然后把它包装得美美的
放在橱窗,架子上贩卖
客人看到开心,我也开心


节庆的时候,和亲爱的家人朋友布置自己的咖啡店
让大家可以感觉到那节日的气氛
有空的时候,约三五知己到自己店里品茶吃点心
聊聊天天,说说笑
你说,这是不是人生中的快事?


在我国,有一间让我感动的主题咖啡店
老板和老板娘都有相同的梦想
他们朝着那梦想出发,努力
结果他们成功了
让它成名了,而且还很受大家的喜爱
那就是 Dreamz Bakery

虽然我不懂我是否能成功地向我梦想出发
但我相信,人因梦想而美丽

[照片转载自Google]


Walnut Butter Pound Cake & Royal Icing Butter Cookies

Yeah~~ Finally made this cute cookies today...
I think I should concentrate on my revision start from ... ... Tomorrow? 
Lolz~
Still have about 2 more weeks for me to do revision on this repeating subject
May god bless us, ALL of us can graduate on time, no more extend

Okla~~I promise, today should be last day for me to bake anything
until I finish final exam
XD
Since now is holiday for my little sister
So I asked her to help instead of playing computer all the day
So, this is what she did~


Before I get started with the little cute cookies
I've baked a Walnut Butter Pound Cake
as a tea-snack for family
Recipe retrieved from Carol 自在生活
but I modify it a bit
(Sorry~~is a bit burn~~)

Walnut Butter Pound Cake
Ingredients A:
Flour 100g
Butter 100g
Sugar 20g
Egg Yolk 2

Ingredients B:
Egg White 2
Sugar 40g

Ingredients C:
Walnut for garnish

Directions:
1. Put butter in room temperature to soften. Beat it with hand whisker for one minute, gradually add in sugar and whisk again, until light and fluffy.
2. Slowly add in egg yolk into butter batter and whisk well.
3. Add flour into yolk batter and stir it with spatula.
4. Use electronic mixer to beat egg whites, meanwhile, add in sugar gradually until firm.
5. Add 1/3 egg white into yolk batter, use cut and fold to mix well. Pour the mixed batter into the leftover egg white. Once again, cut and fold to mix it well.
6. Pour the mix batter into the mould, garnish with walnuts. Send into oven, 170 degree celcius for 50 minutes.


Yeah~~ It is Royal Icing's Turn! 
So, let's share you the recipe for this little cute cookies~
By the way, the recipe retrieved from 小本厨房 

Ingredients A:
Butter 60g
Sugar 40g
Egg 30g
Vanilla Essence 1/4 teaspoon
Salt 1/4 teaspoon
Flour 150g

Ingredients B:
Icing Sugar 180g
Egg White 30g
Lemon Juice 1/2 teaspoon
Vanilla Essence 1/4 teaspoon
Food colouring

Directions A:
1. Put the butter in room temperature to soften it. Beat it with electronic mixer, add in sugar gradually, until light and fluffy.
2. Slowly add in egg yolk, vanilla essence and salt, beat well.
3. Add in flour and knead it with hand.
4. Roll the dough for about 0.5mm, cut it with any favourite cookies cutter. Place the cut dough on pan and poke some holes with toothpick, then send into oven for 20-25 minutes, 160 degree celcius. 
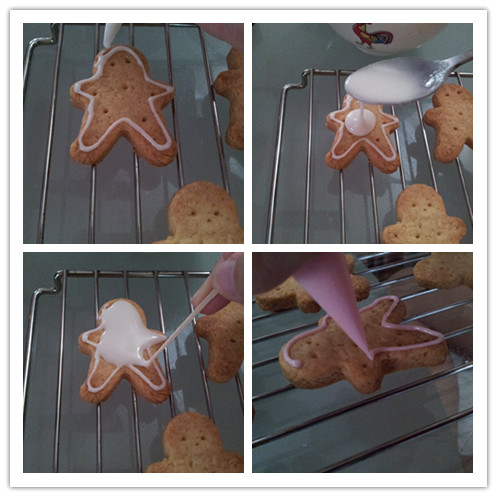
5. Let the cookies cool and decorate with royal icing.

Directions B:
1. Sift icing sugar into a bowl, add in egg white and stir well. Add in lemon juice and vanilla essence. Stir well.
2. Divide the royal icing into three bowls (I use 3 colours). Each colour scope about 1 or 2 spoons into three piping bag, to draw outline.
Thicker one as picture 7 shown.
Thinner texture as picture 6 shown.
3. Leftover royal icing add little water to make it thinner. Put aside.
4. Place the cooled cookies on rack and decorate.

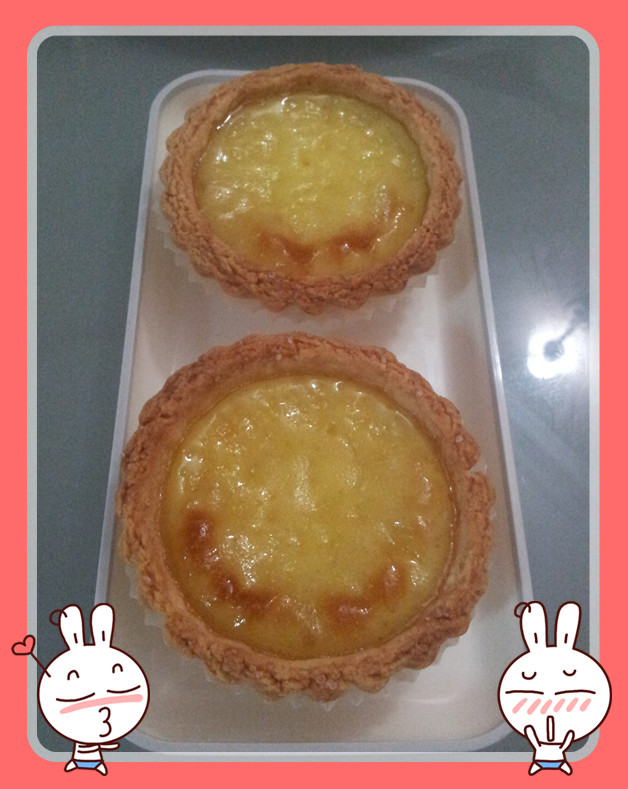
Hmmm...today is the first time I make Royal Icing Butter Cookies
The shape, the decorations not really nice
But, nevermind, practices make perfect!

So, here is what I made~~


Tuesday 4 December 2012

Last BBQ before Graduate

Today should be the last BBQ I had with my 3 years coursemates!
Yeah~ This is annual event that is MUST have
Unfortunately, some of them couldn't join us due to they back hometown already
(╥﹏╥)

Maybe we could have another gathering? Perhaps...

Once decided to have the last BBQ
Been thinking what's for the menu
So, I Google search the Recipe from "License to Grill" at Asian Food Channel
Robert Rainford, a grill master
Watch his programmes for years
Seriously love all of his grilling recipes

(づ。◕‿‿◕。)づ

So, I've picked a few recipe for today's BBQ and modify a bit~
Lolz~due to lack of ingredients~~ >,<
Invitation Card? Lolz~
Actually, I was thinking to print this and give it to them
But we couldn't come out the common date
End up, some of them couldn't make it
So... ... ...

Well~been worked for BBQ's stuff for a few days
Buy ingredients, prepare ingredients, bake dessert and etc...
Exhausted ~~
Luckily the outcomes is satisfying, by me and also my lovely coursemates~

Main dishes~~

Side dishes, dessert and fruit punch~~
- Japanese Sweet Potatoes
- Vegies
- Garlic ... @.@
- Sauces
- Caramel Pudding Chiffon Cake aka "Doinkz Doinkz" Cake
-Fruit Punch

Friends said that, I could open a stall to sell the "Doinkz Doinkz" cake
Anyone wants to make order?? Lolz~


Today should be the last gathering for us
Somehow, we did not capture as much photos
We were just concentrate on the FOODSSSS~~
lolz~~ ... ... ...

(●⌒∇⌒●)

By the way, some unhappy things occur
Seriously, I felt sorry to her
•(⌚_⌚)•
... ... ...
Because I stole her phone to made fun ...
Sorry~

Sunday 2 December 2012

三点三下午茶 - 蛋挞

终于把毕业论文交上去了,可以松一口气了
突然,倍感无聊与寂寞
可能是之前都在赶,时间不够用
然而现在空闲了,却不自在
¯\(©¿©) /¯

既然无聊,就来做点别的~
蛋挞!我的最爱~
之前做了好几次,都不成功
都不懂是什么问题
无意中让我看到 简易食谱 有蛋挞的教程
那就只好就地取材咯~
哈哈~~


材料 (约19个)
挞皮:
面粉 300g
牛油 125g
糖粉 55g
鸡蛋 1颗
Vanilla Essence 少许 (可以免了,如果不爱香精的味道)

蛋液:
蛋 6颗
糖 220g
牛奶 170g
热水 170g
Vanilla Essence 1/2茶匙 (可以免了,如果不爱香精的味道)
[蛋液的原食谱是以上一半的分量,可是我的挞皮比较薄,做多了,所以蛋液不够]

p/s: 个人认为饼皮太甜了,如不喜爱太甜的,请自行减少糖的分量。额外加一点盐在饼皮,应该会不错。

做法:
蛋液~~
1:把糖倒进热水搅至溶化(如果水不够热,放在路上加热),备用。
2:鸡蛋+牛奶搅匀,加入冷却的糖水和 vanilla essence ,用网筛过滤掉鸡蛋快。

饼皮~~
1:把牛油放室温中待软化。用电动打蛋器把牛油打松,分两次加入糖粉打至奶白色。
2:缓缓加打散的蛋液进牛油糊里,搅匀。
3:面粉分两次加入牛油糊,用刮刀搅拌成团。

4:把面团擀平约5mm厚,用圆形的饼干模割出比挞模小一点的面团。把每份切割好的面团放在挞模里,用两只拇指压好挞皮。尽量把挞皮压高过挞模,因为烤好的挞皮会回缩一点点。
5:预热烤箱200度。把预备好的蛋液倒入挞皮内。把装满蛋液的挞壳放进烤箱,烤约10-15分钟/挞皮呈金黄色,把温度调低约180度,靠只蛋液微胀起,就立刻打开烤箱的门2至3寸,烤多10-15分钟即可。


Saturday 24 November 2012

绿色的一天

最近的绿色盛会闹得沸沸扬扬的
没参加那盛会的我,也在家里支持一下
做了两款的绿色甜点
抹茶烤补丁 + 抹茶饼干


材料:
蛋黄 2个
细砂糖 25g
淡奶油 120g
牛奶 50g
抹茶粉 3g(约1/2 茶匙多一点)


做法:
1:蛋黄 + 砂糖 + 抹茶粉脚把均匀备用。
2:牛奶和淡奶油加热至边缘起泡即可。
3:将热牛奶缓慢的加入蛋黄糊里,边倒边搅拌均匀后过滤。
4:缓慢的倒入小杯中,如有气泡用汤匙舀出来。
5:余热烤箱170度,在烤盘装满开水,把杯子放在烤盘上,蒸烤。
6:170度,20-25分钟(看杯子的大小调时间),取出放凉后再放冰箱。

由于家里的器皿有限
只能将就点,用仅有的铁杯子来烤
卖相就不是很吸引了
(◕︵◕)

虽然卖相不好,可是味道是还不错的
可是我觉得抹茶的味道不是很够
被牛奶和奶油味盖过去了
可能是我的抹茶粉不够正宗吧
所以~~>.<


补丁在冰箱里享受冷气的当儿
就开始做抹茶饼干

材料:
底筋面粉 180g
牛油 100g
泡打粉 2/3小匙
抹茶粉 2大匙
砂糖 80g
蛋 1颗

做法:
1:把所有粉类过筛备用。 
2:把牛油放在室温至软化,用电动打蛋器将牛油打至滑顺。
3:把糖分3次加入牛油里打至奶白色如图5。
4:过后,将蛋液打散,分2次加入牛油糊里搅拌均匀。
5:搅拌好后,加入粉类揉成团。
6:把揉好的面团用保鲜膜/原子袋包好放入冰箱冷藏30分钟。

7:把面团从冰箱拿出来,分成25个小球(要大要小自己爱)
8:把小球搓圆放在烤盘上。用任何平的器皿把小球压扁如图13。
9:扁平的抹茶面团没什么特色,我就自做主张用小花饼干模在上面印个小花如图14 & 15。
10:把印好的面团送进已预热的烤箱里烤25-30分钟,150-160度。

(▰˘◡˘▰)

饼干在烤着时,家里充满了牛油的香气~
美中不足的是,没了抹茶的香气。。
⊙︿⊙

下次应该要买比较好的抹茶粉~